We’ve made it simple and quick to replenish your trimmer line by designing the Powerload ™ grass trimmer models. However, once you know the trick, even the more traditional ways of replacing grass trimmer wire are fairly simple.
Powerload™ self winding trimmer line
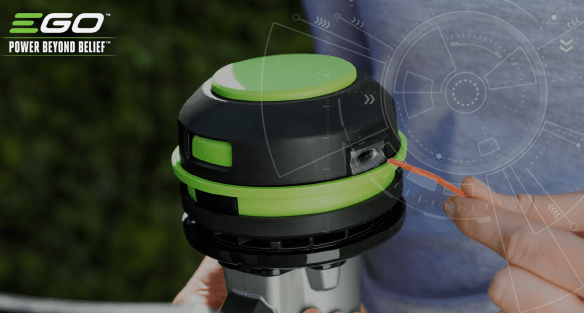
Our 38cm line trimmer is the world’s first grass trimmer to wind its own line, minimising the interruption to your work and making an easy, fast task out of replenishing the cutting line. How fast? It’s all done and ready to go in 10 seconds.
- Safety first - remove the EGO battery
- Remove any remaining cutting line by simply pulling it out
- Insert one end of your pre-cut line, and thread through the opposite eyelet
- Pull the line until there is even lengths either side of the trimmer head
- Re-insert the battery pack then press and hold the line-loading button to start the self-winding motor. The line will be wound into the trimmer head continuously.
- Watch carefully and release the line-loading button when there is around 14cm of line on either side.
This grass trimmer comes in a money-saving 38cm line trimmer kit with battery and charger. One other EGO battery operated line trimmer also has Powerload ™ technology and comes in a kit.
The usual trimmer line reload
You can buy a ready-wound spool for your line trimmer, or you can bulk buy the nylon line and wind it yourself - though our bump heads help you replenish trimmer line on the go.
1. Wind it by hand
- Safety first - remove the EGO battery
- Remove any remaining cutting line
- Insert a pre-cut length of line into mounting hole inside the eyelet. Push and pull the line from the other side until equal amounts of line appear on both sides of the spool.
- Press, while rotating the lower cover assembly in the arrow direction, to wind the line onto the spool until approximately 14cm of line is showing on each side.
- Push the lower cover assembly down while pulling on the lines to manually advance the line and to check for proper assembly of the trimmer head.
2. Pre-wound spool replacement
- Safety first - remove the line trimmer battery
- Remove the spool retainer from the spool assembly by pressing the tabs
- Check the spool is empty and the assembly is clean and in good working order
- Place the pre-wound spool into the retainer and align notches and eyelets
- Fit the ends into opposite notches on the spool with 4” left on each side
- Align the spool notches with the retainer eyelets and replace the spool
- Tug the line ends from the notches in the spool and fit into retainer eyelets
- Check spring is properly located in the spool base - tighten if necessary
- Align tabs on the retainer with the slots on the base and click into place
Check out the full range of line trimmers (with and without brush cutters).