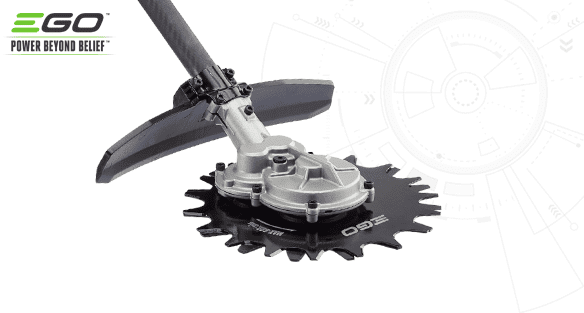
The rotocut multi-tool attachment is a robust garden tool that can take on the toughest weeds and moss.
It’s cordless and powered by our ARC Lithium battery, which keeps vibration to a minimum and is easy to handle. Its 23cm cutting width can take on large areas of stubborn brush, while durable, low throw alloy steel blades mean it’s safer to use in delicate areas.
3 maintenance tasks you can do at home
Safety first
- To avoid serious personal injury, always remove the battery pack when cleaning or performing any maintenance. The battery is accessible and can be removed and replaced instantly.
- Never touch blades or service the unit with a battery pack installed.
- When handling the blade assembly, wear non-slip, heavy-duty protective gloves. Don’t place your hand or fingers between blades or in any position where they could get pinched or cut.
If any parts need replacing, we recommend a qualified service engineer at your local dealer.
1. Cleaning your rotocut blade
Tools
- Damp cloth
- Mild detergent
- Dry cloths
Caution!
- Avoid using solvents (like kerosene) or detergents containing aromatic oils (like pine or lemon) on plastic parts as it will damage them.
Cleaning
- Remove the battery and remove the attachment head from the multi-tool shaft.
- Clean the unit using a damp cloth with a mild detergent.
- Moisture is a shock hazard, so wipe off excess moisture with a soft dry cloth.
2. Sharpening your rotocut blade
Tools
- Clamp or vice on workbench (alternatively, pliers)
- Wrench
- New blades
- Safety gloves
Caution!
- If the blades become loose after the head is fixed in position, or the blades are badly worn, replace them immediately.
- Never use the multi-tool with a loose or ineffective cutting attachment.
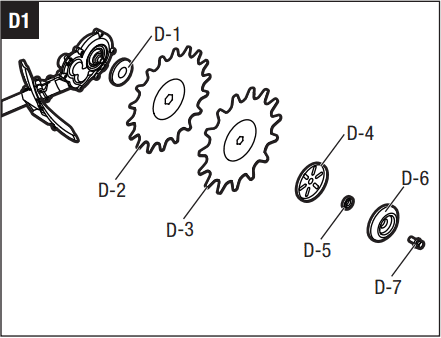
- Check the diagram of the rotocut head in your manual before you begin.
- You can take your rotocut to your local EGO dealer, where a qualified engineer can replace your rotocut blade.
Sharpening

- Remove the battery and remove the attachment head from the multi-tool shaft.
- Place the gear case of the rotocut head against a solid surface.
- Clamp the up and down blades with pliers or in a vice, then use a wrench to loosen the nut.
- Remove the nut, gliding bowl, washer, support cup, down blade, up blade and shaft cup in sequence (see Fig. D1 above and in the rotocut manual).
- Before installing new blades, put the shaft cup on the shaft.
- Put the top-blade (D-2) with the large hexagonal hole onto the shaft with the “EGO” logo facing toward the gear case.
- Put the bottom-blade (D-3) with the small hexagonal hole onto the shaft with the “EGO” logo facing toward the operator.
- Make sure the hexagon holes on the blades and hexagon shaft shoulder fit in place. If they are not in place, once the blades are mounted reversely, the rotocut can’t work correctly and will damage the blades.
- Reassemble the rotocut head in the reverse sequence shown in the diagram.
3. Lubricating your rotocut gear case
Tools
- A suitable Ester-based grease with DIN51818: NLGI-1 cone penetration. See the manual for the full specification.
Caution!
- For best performance and longer lifetime, lubricate the gear case with a particular grade of grease after every 50 hours’ operation.
- Don’t lubricate while the machine is still connected to the battery or running.
Lubricating the gear case
For best performance and longer lifetime, lubricate the gear case with a particular grade of grease after every 50 hours’ operation. Check your manual for full details.
- Remove the battery plug and sealing screw.
- Lubricate the gear case through the oil-hole.
Regular maintenance
Looking after your EGO battery powered rotocut attachment will keep it working optimally. We’re confident your battery powered garden tool will last for years and years - check out our excellent warranties.
Don’t forget to get it serviced at your local dealer, where a qualified engineer will replace worn or damaged parts like for like.
